The Definitive Answer: Using a Meat Grinder for Tomato Processing
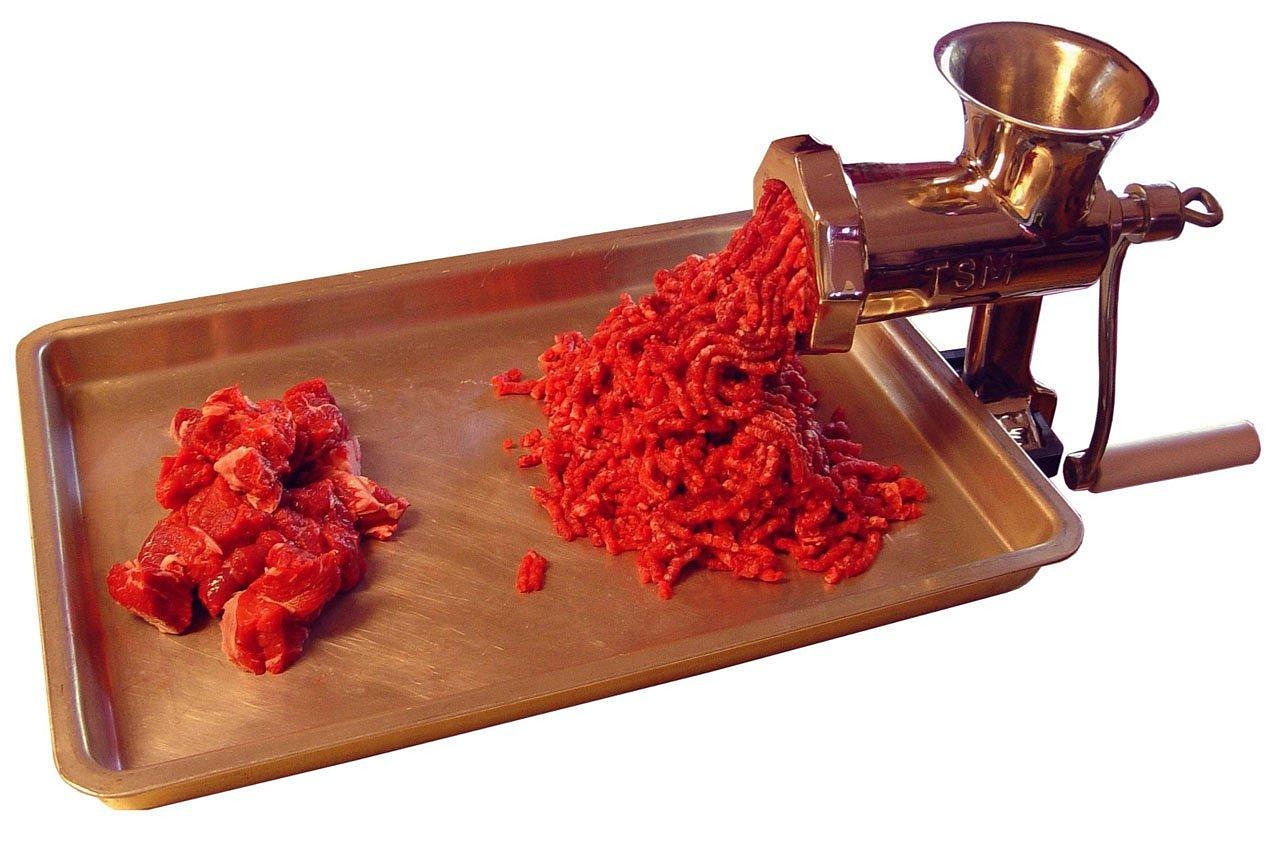
Yes, you absolutely can use a meat grinder for tomatoes, but the efficiency and quality of the resulting product depend entirely on the equipment setup. While a standard meat grinder is designed to break down dense, fibrous muscle tissue, it can process soft fruits like tomatoes. However, to achieve the smooth, seedless, and skin-free consistency desired for sauces, purees, and juices, a specialized attachment is essential.
Using the standard grinding plates and blade will result in a pulpy, watery, and highly seeded mash. For serious home preservation or large-batch sauce making, the dedicated tomato strainer or juicer attachment transforms the meat grinder into a highly effective, high-volume food mill.
Why Meat Grinders Excel (or Fail) at Tomato Processing
Meat grinders operate by forcing material through a perforated plate using a rotating auger and cutting blade. When processing meat, this action creates uniform particles. When processing tomatoes, the soft, watery structure presents unique challenges:
- Standard Plates: If you use a coarse or fine grinding plate (typically 4.5mm to 10mm), the grinder will crush the tomato flesh and seeds together. The resulting output is a chunky, inconsistent mixture that retains all the skins and seeds, requiring extensive secondary processing (like running it through a sieve or food mill anyway).
- Tomato Strainer Attachment: This specialized accessory replaces the standard grinding head. It features a long, conical screen (or sieve) and a spiral auger that separates the liquid and pulp from the solid waste (skins, seeds, and cores). This method is fast, efficient, and produces a clean, ready-to-cook puree in a single pass.
The Critical Difference: Grinding vs. Straining
Understanding the mechanical difference between grinding and straining is key to success when using a https://meatgrinderhelp.com/.
| Feature | Standard Grinding Setup | Tomato Strainer Attachment |
|---|---|---|
| Mechanism | Cutting and forcing through a fixed plate. | Pressing and separating pulp through a conical screen. |
| Output | Chunky, seeded, and skin-filled mash. | Smooth, seedless, skin-free puree/juice. |
| Efficiency | Low; requires pre-blanching/peeling and secondary straining. | High; processes whole, raw tomatoes quickly. |
| Best For | Small amounts of chunky salsa base (if skins are removed). | Large-batch canning, sauces, and juices. |
Essential Equipment: Meat Grinder Attachments for Tomatoes
To effectively use your meat grinder for tomato sauce, you must invest in the correct accessory. These attachments are often sold separately and are compatible with various grinder sizes (usually #5, #8, #12, or #22).
The Tomato Strainer/Juicer Attachment: The Ideal Solution
This is the definitive tool for processing tomatoes using a meat grinder. It typically consists of three main components:
- The Hopper: A large tray or funnel that holds the pre-cut tomatoes.
- The Auger and Screen: A long, tapered auger pushes the tomatoes against a fine mesh screen, separating the liquid pulp from the solids.
- The Waste Chute: A separate spout where the dry, discarded skins and seeds exit.
When selecting a strainer, ensure it is made from food-grade materials, preferably stainless steel or durable, BPA-free plastic, as tomato acid can react with certain metals over time.
Specific Brand Compatibility: KitchenAid Meat Grinder for Tomatoes
One of the most common applications of using a meat grinder for tomatoes involves stand mixers, particularly the KitchenAid brand. KitchenAid offers a specific Fruit and Vegetable Strainer Set that attaches to their standard KitchenAid meat grinder attachment for tomatoes.
This system is highly popular among home cooks because it utilizes the powerful motor of the stand mixer, providing a hands-free, continuous operation ideal for processing bushels of tomatoes during harvest season. When purchasing, always verify that the strainer set is compatible with your specific mixer model and grinder head size.
Standard Grinding Plates: The Workaround (With Caveats)
If you absolutely must use the standard grinding plates, follow these steps to minimize clogging and improve results:
- Blanch and Peel: Drop tomatoes into boiling water for 30–60 seconds, then immediately transfer them to an ice bath. The skins should slip off easily. This prevents the tough skins from clogging the plates.
- Deseed: Cut the tomatoes and scoop out as many seeds as possible. Seeds are hard and can be difficult for smaller plates to process smoothly.
- Use Coarse Plate: Select the largest grinding plate available (e.g., 10mm or 12mm). This reduces the pressure and prevents the tomato from turning into a watery foam.
Note: This method is time-consuming and still yields a less refined product than a dedicated strainer. For a more efficient manual option, consider reviewing a best manual meat grinder guide that might feature models with included strainer attachments.
Step-by-Step Guide: Preparing Tomatoes for the Grinder
Proper preparation is crucial for maximizing yield and protecting your equipment, especially when processing large volumes of tomatoes for preservation.
Selecting the Right Tomato Variety
The best tomatoes for sauce and grinding are those with high flesh-to-water ratios and low seed counts. Varieties like these minimize waste and produce a thicker, richer sauce base:
- Roma (Plum) Tomatoes: The gold standard for sauce. They are meaty, dense, and have fewer seeds and less water than slicing tomatoes.
- San Marzano: A premium, elongated variety known for its low acidity and excellent flavor profile for canning.
- Amish Paste: Large, dense paste tomatoes that yield a thick puree.
Avoid large, watery slicing tomatoes (like Beefsteak) unless you plan to cook the sauce down significantly, as they produce a thin, foamy output when strained.
Pre-Processing: Washing, Coring, and Quartering
Whether using a standard plate or a strainer attachment, preparation remains simple:
- Washing: Thoroughly wash all tomatoes under cool running water to remove dirt and debris.
- Coring: Use a sharp paring knife to remove the tough, white core and stem scar from the top of the tomato. This hard material can strain the grinder motor and is undesirable in the final sauce.
- Quartering: Cut the tomatoes into pieces small enough to fit comfortably into the grinder’s feed tube or the strainer’s hopper. For most home grinders, quartering or halving large tomatoes is sufficient.
Crucially, if using the strainer attachment, do not peel or deseed the tomatoes beforehand. The attachment is designed to handle this separation automatically, saving significant time.
Technique Mastery: Operating the Meat Grinder for Sauce
Operating the meat grinder with the tomato strainer attachment requires a slightly different approach than grinding meat to ensure smooth, continuous flow and maximum yield.
Setting Up the Strainer Attachment
- Assembly: Ensure the conical screen is securely attached and the waste chute is positioned over a separate bowl or container to catch the skins and seeds.
- Lubrication: Run a small amount of water or a few pieces of tomato through the attachment before starting the main batch. This helps lubricate the auger and prevents initial sticking.
- Placement: Position the grinder so the puree output spout is directly over a large, clean stockpot or bowl. Use a deep container, as the puree can flow out rapidly.
Optimizing Feed Rate and Consistency
The key to efficient straining is a consistent, moderate feed rate. Do not overload the hopper or force the tomatoes down aggressively. Allow the auger to pull the material through naturally.
- Slow and Steady: Feeding too quickly can cause the waste chute to clog prematurely or result in wetter waste, meaning you leave valuable pulp behind.
- Motor Speed: If using an electric grinder, use a medium speed setting. High speeds can sometimes whip air into the puree, creating excessive foam, while very low speeds might struggle to push the waste out effectively.
Handling Waste Pulp and Seeds
As the tomatoes process, the waste material (pomace) will exit the end of the conical screen. This waste should be relatively dry. If the waste is still very wet, it indicates that the auger is not pressing hard enough or the screen is slightly clogged. You can often improve the yield by:
- Reprocessing: Run the waste material through the strainer a second time. This is particularly effective if you are processing very large, watery tomatoes.
- Adjusting Pressure: Some commercial-grade strainers allow you to adjust the pressure screw at the end of the waste chute. Tightening this screw increases the pressure on the pulp, resulting in drier waste and higher puree yield.
Troubleshooting Common Issues
Even with the correct attachment, processing large volumes of tomatoes can lead to minor operational hurdles.
Clogging and Backflow Prevention
Clogging usually occurs when hard pieces (like large cores) or excessive skins build up at the end of the screen. To prevent this:
- Pre-Cut Properly: Ensure all cores are removed and pieces are small enough to pass easily.
- Monitor Waste: If the waste chute output slows significantly or the waste becomes mushy, stop the machine immediately, disassemble the end cap, and clear the blockage.
- Clean Regularly: If processing hundreds of pounds, pause every hour to quickly rinse the screen and auger to remove sticky residue.
Achieving the Desired Consistency
The consistency of the final puree is determined by the screen size of the attachment. Most standard tomato strainers produce a medium-fine puree suitable for basic sauce. If you desire a thicker, paste-like consistency, you will need to cook the puree down significantly.
For a thinner juice, some attachments offer a coarser screen option, though the primary factor remains the water content of the tomatoes used.
Cleaning and Maintenance After Processing Acidic Foods
Tomatoes are highly acidic, and their residue can cause corrosion or staining on metal parts if left uncleaned. Proper care is vital for the longevity of your equipment.
- Immediate Rinse: As soon as you finish processing, disassemble all parts and rinse them thoroughly with cold water. This prevents the acid from etching the metal or plastic.
- Neutralize Acid: Wash all components, especially the metal auger and screen, with warm, soapy water. Use a soft brush to clean the mesh of the screen.
- Drying: Dry all metal parts immediately and completely. Do not allow them to air dry, as this encourages rust, particularly on cast iron or carbon steel components. Store parts in a dry environment.
For detailed care instructions for your grinder, consult guides on Care & Maintenance.
Comparison: Meat Grinder vs. Dedicated Food Mill vs. Blender
While the meat grinder with a strainer attachment is highly effective, it is useful to understand how it compares to other common kitchen tools used for tomato processing.
| Tool | Speed & Volume | Consistency | Ease of Use & Cleanup |
|---|---|---|---|
| Meat Grinder + Strainer | High volume, very fast continuous operation. | Excellent, smooth, seedless puree. | Moderate assembly, easy continuous feeding. |
| Dedicated Food Mill | Moderate volume, requires manual cranking. | Very good, adjustable consistency based on screen. | Low assembly, requires constant manual effort. |
| High-Powered Blender | Fast, but low volume (batch processing). | Very smooth, but retains all seeds and skins. | Easy cleanup, requires secondary straining for sauce. |
| Immersion Blender | Slow, requires cooking first. | Chunky, retains seeds and skins. | Very easy cleanup, best for chunky sauces. |
The meat grinder setup is superior for individuals processing large quantities (50+ lbs) of tomatoes for canning or freezing, offering the best combination of speed and quality output without manual effort.
Maximizing Your Yield: Tips for Large-Batch Tomato Sauce
Processing tomatoes efficiently requires planning and proper technique, especially when dealing with a full harvest.
- Process Raw: Unlike some traditional methods that require cooking tomatoes first, the meat grinder strainer attachment works best with raw, firm tomatoes. This preserves the fresh flavor and reduces preparation time.
- Keep it Cold: If your grinder motor runs hot, the heat can slightly cook the tomatoes, making the pulp stickier. Keep the tomatoes cool before processing, and consider chilling the metal parts of the attachment (if possible) before use.
- Use the Right Plate: If you are using a standard grinder for a chunky salsa base, ensure the plate is coarse enough to prevent excessive pressure buildup. Consult Grinding Techniques for optimal plate selection.
- Batch Processing: If you have a smaller grinder (like a #5 or #8), process in batches and allow the motor to cool down between runs to prevent overheating and potential damage.
Get Started: Transforming Your Harvest into Homemade Sauce
Ready to put your meat grinder to work? By utilizing the correct tomato strainer attachment, you can dramatically reduce the time and effort required to produce high-quality, homemade tomato sauce, puree, or juice. This method ensures a smooth, professional consistency perfect for canning and freezing, allowing you to preserve the flavor of your harvest efficiently.
Ensure your equipment is clean, your tomatoes are cored, and you have large containers ready to catch the rich puree. The investment in the proper attachment will pay dividends in time saved and superior results.
Frequently Asked Questions (FAQ)
Can I use a meat grinder to make tomato juice?
Yes. The tomato strainer attachment is essentially a juicer. It separates the liquid and fine pulp from the seeds and skins, producing a thick, fresh tomato juice or thin puree that can be consumed immediately or cooked down into sauce.
Do I need to peel the tomatoes before putting them in the meat grinder?
No, if you are using the dedicated tomato strainer attachment, peeling is unnecessary. The strainer’s conical screen and auger are specifically designed to separate the skins and seeds from the pulp, pushing the dry waste out through a separate chute.
Will using a meat grinder damage the seeds?
If using the standard grinding plates, the seeds will be crushed, releasing bitter compounds into the sauce. This is why the standard setup is discouraged. The strainer attachment, however, keeps the seeds intact and separates them cleanly, preventing bitterness.
What size meat grinder is best for processing tomatoes?
For large-batch processing (over 50 pounds), a size #12 or #22 electric grinder is recommended, as they have powerful motors and larger feed tubes, allowing for faster, continuous operation. For smaller home batches, a size #8 or a KitchenAid attachment is usually sufficient.
Can I use the meat grinder to process other fruits or vegetables?
Yes. The strainer attachment is often suitable for processing soft fruits like berries, cooked apples (for applesauce), and soft peppers. However, for hard vegetables or fibrous materials, consult your specific grinder’s manual, as standard grinding plates are usually required for those tasks.
References
- U.S. Department of Agriculture (USDA). Complete Guide to Home Canning, 2025 Edition. 2025. https://nchfp.uga.edu/ — This comprehensive guide provides essential, up-to-date food safety standards for processing and preserving acidic foods like tomatoes at home.
- University of Minnesota Extension. Selecting and Preparing Tomatoes for Preservation. 2025. https://extension.umn.edu/ — This resource details the best tomato varieties and preparation techniques to maximize yield and quality when making sauces and purees.
- KitchenAid. Using the Fruit and Vegetable Strainer Attachment. 2025. — An official guide detailing the setup, operation, and cleaning procedures for using the popular stand mixer attachment for processing non-meat items like tomatoes.
Last Updated on October 14, 2025 by Robert Vance