The Legacy of the Universal Meat Grinder: A Historical Overview
The term “universal meat grinder” primarily refers to a specific class of robust, hand-operated, clamp-style grinding machines that dominated home and small-scale commercial meat preparation throughout the late 19th and early 20th centuries. These grinders, often manufactured by companies like the Enterprise Manufacturing Co. of Philadelphia, were characterized by their heavy cast-iron construction, simple screw-feed mechanism (auger), and standardized, interchangeable parts.
The designation “Universal” was not merely a brand name but reflected the widespread adoption and the general standardization of the design, allowing users to easily find replacement universal meat grinder parts such as plates and knives. This standardization ensured longevity, making these vintage machines highly sought after by modern enthusiasts who value durability and mechanical simplicity.
Why the Universal Design Endures
Unlike many modern electric grinders that rely on plastic components or proprietary designs, the Universal grinder was built for decades of heavy use. Its core mechanical principle—forcing meat through a cutting plate using a rotating auger—remains the fundamental design for virtually all meat processing equipment today. The manual operation provides precise control over the grinding process, which is crucial for certain grinding techniques.
Identifying Your Universal Meat Grinder Model
Universal grinders were produced in various sizes, typically designated by numbers that corresponded to their capacity and the diameter of the cutting plate. Identifying the correct model is essential for purchasing compatible replacement parts, especially the plates and knives.
Key Universal Models and Specifications
| Model Number | Plate Diameter (Approx.) | Capacity/Use Case | Identifying Features |
|---|---|---|---|
| Universal No. 1 | 1 3/4 inches | Small household batches | Compact size, often used for nuts or small amounts of meat. |
| Universal No. 2 | 2 1/8 inches | Standard household use | The most common model, excellent for general home grinding. |
| Universal No. 3 | 2 1/2 inches | Larger household/small farm | Increased capacity for bulk processing or sausage making. |
| Universal No. 1572 | Varies (often No. 2 size) | Specialty/Later Production | Often features a slightly different clamp mechanism or material composition. |
To identify your specific model, look for the number cast directly into the body of the grinder, usually near the clamp mechanism or on the main housing. The size of the plate is the most critical measurement for parts replacement.
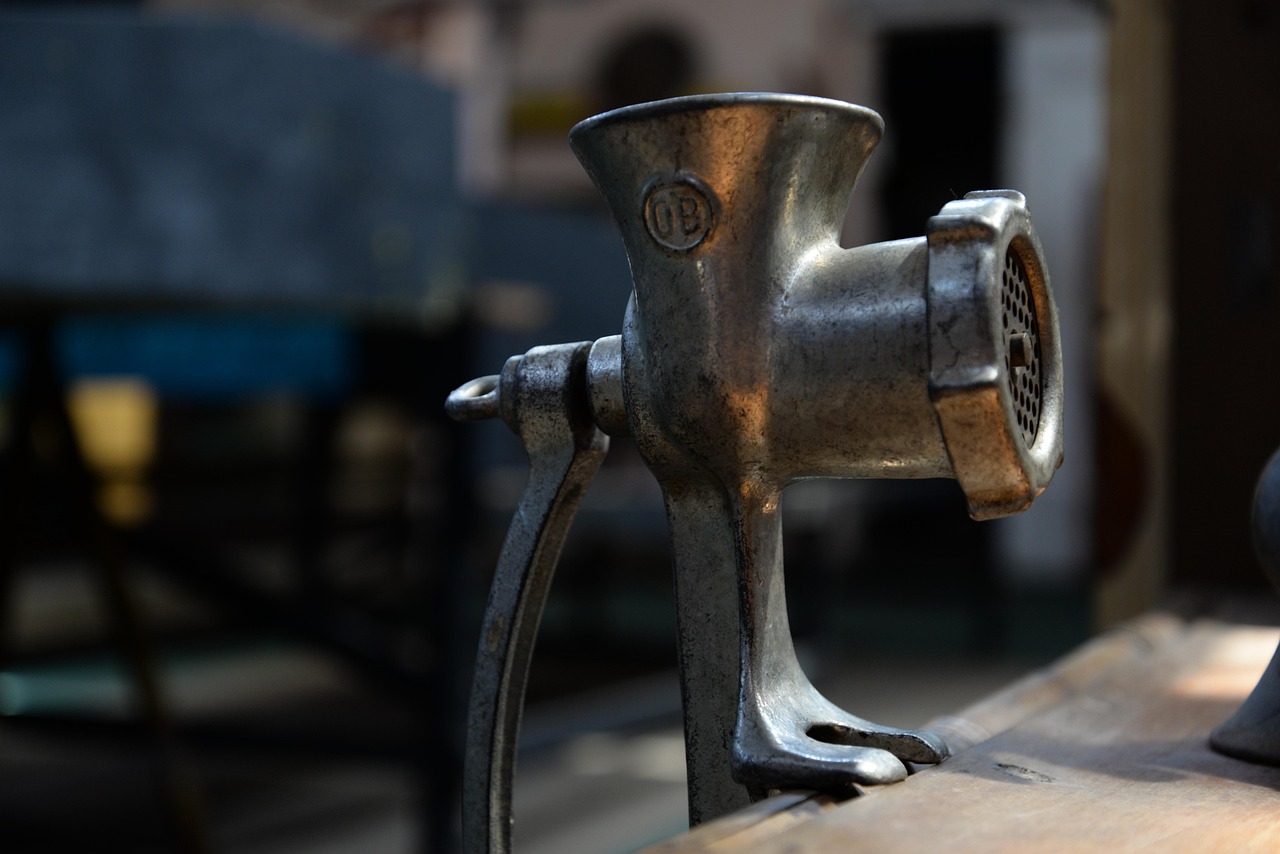
Essential Universal Meat Grinder Parts and Components
Understanding the function and proper assembly of each part is vital for achieving a clean, safe grind. The Universal design relies on four primary components working in perfect synchronization.
1. The Auger (Worm)
This is the helical screw that draws the meat from the hopper into the cutting chamber. It must be perfectly clean and free of rust to move the meat efficiently and maintain food safety standards.
2. The Knife (Cutter)
The four-bladed knife rotates against the stationary plate. For optimal performance, the knife must be razor-sharp and seated flush against the plate. A dull knife will mash the meat rather than cut it, leading to poor texture and potential motor strain if the unit is motorized.
3. The Plate (Die)
This circular component determines the fineness of the grind. Plates are available in various hole sizes (e.g., coarse, medium, fine). The plate must be positioned correctly with the flat side facing the knife and the recessed side facing the locking ring.
4. The Locking Ring (Cap)
This ring screws onto the end of the grinder body, holding the plate and knife securely in place against the auger. It must be tightened firmly, but not excessively, to ensure the knife and plate maintain contact without causing undue friction.
Crucial Assembly Tip: When assembling the universal meat grinder 2 instructions or any model, ensure the knife is placed on the square shaft of the auger before the plate. The flat side of the knife must face the flat side of the plate.
Restoration and Care for Vintage Universal Grinders
Restoring a vintage cast-iron Universal grinder requires careful attention to detail, particularly concerning rust removal and seasoning, which are critical for both performance and food safety.
Step-by-Step Restoration Process
- Disassembly and Initial Cleaning: Completely disassemble the unit. Use hot, soapy water and a stiff brush to remove old grease and debris. Avoid harsh chemical cleaners that can damage the metal.
- Rust Removal: For light rust, use fine steel wool or a brass brush. For heavy rust, electrolysis or soaking in a vinegar solution (1 part vinegar to 1 part water) for no more than 12 hours can be effective. Caution: Do not leave cast iron in acidic solutions for extended periods, as this can cause pitting.
- Drying and Seasoning: Immediately after rinsing, thoroughly dry all parts to prevent flash rust. Heat the cast-iron body and components in an oven at 200°F (93°C) for 15 minutes. While warm, apply a thin layer of food-grade mineral oil or a high smoke point cooking oil (like flaxseed or grapeseed oil) to all surfaces. Wipe off any excess.
- Curing: Place the oiled parts back in the oven, increasing the temperature to 450°F (232°C) for one hour. Turn off the oven and allow the parts to cool slowly inside. This process creates a protective, non-stick, rust-resistant layer, similar to seasoning cast-iron cookware.
Operating the Universal Meat Grinder: Techniques for Optimal Results
While simple in design, proper technique is essential when using a manual universal meat grinder to ensure a consistent texture and prevent jamming.
1. Meat Preparation
Meat must be partially frozen or very cold (around 30°F to 32°F or -1°C to 0°C). Cut the meat into strips or cubes small enough to fit easily into the hopper opening. Remove all sinew, silver skin, and tough connective tissue, as these can wrap around the auger and clog the plate.
2. Assembly and Clamping
Securely clamp the grinder to a sturdy, stable surface. Ensure the knife and plate are correctly seated and the locking ring is hand-tightened. The grinder should not wobble during operation.
3. Grinding Motion
Maintain a steady, consistent speed when turning the crank. Avoid sudden bursts of speed or stopping and starting, which can cause the meat to warm up or smear. Use your non-cranking hand to gently feed the meat into the hopper; never force the meat down with excessive pressure, as the auger should draw it in naturally.
Modern Adaptations: Converting Manual Universal Grinders to Electric Power
Due to their robust construction, many users choose to convert their Universal No. 2 or No. 3 grinders into motorized units for high-volume grinding. This process requires mechanical aptitude and specific safety measures.
Components Required for Conversion
- Motor: Typically a 1/2 HP to 3/4 HP motor running at 1725 RPM.
- Pulleys and Belt: A reduction pulley system is necessary to slow the grinder speed down significantly. The ideal grinding speed is between 90 and 120 RPM. This requires a large pulley on the grinder shaft and a small pulley on the motor shaft.
- Safety Guard: A robust guard is mandatory to cover the belt and pulleys, preventing accidental contact during operation.
- Mounting Base: A heavy, stable base (often wood or steel) to securely mount both the grinder and the motor, ensuring perfect alignment of the pulleys.
Safety Note: Motorizing a vintage grinder significantly increases the torque and potential danger. All modifications must be professionally secured, and the operator must be aware of the increased risk of injury if hands or clothing become caught in the moving parts.
Maintaining Food Safety When Using Vintage Equipment
Food safety is paramount, especially when using older equipment like the Universal meat grinder. Cast iron, if not properly maintained, can harbor bacteria or rust particles.
- Immediate Cleaning: Always clean and dry the grinder immediately after use. Residual meat particles are a breeding ground for pathogens.
- Rust Prevention: Ensure the seasoning layer is maintained. If rust appears, re-season the affected area immediately.
- Sanitization: While soap and water are usually sufficient, occasionally sanitize the disassembled parts using a diluted bleach solution (1 tablespoon of bleach per gallon of water) or a food-grade sanitizer, followed by a thorough rinse and immediate drying.
- Storage: Store the grinder in a cool, dry place. Many users lightly oil the parts before storage to prevent moisture exposure.
FAQ: Common Questions about Universal Meat Grinders
What is the difference between the Universal meat grinder 1, 2, and 3?
The primary difference is size and capacity. The No. 1 is the smallest, designed for light household use. The No. 2 is the standard, most common household size, offering a good balance of capacity and ease of use. The No. 3 is larger, suitable for processing greater volumes of meat, often favored by hunters or those making large batches of sausage making.
Where can I find universal meat grinder parts, especially for the Universal No. 1572?
Because the design was standardized, many modern manufacturers produce replacement parts compatible with the vintage Universal models. Specialized online retailers focusing on antique kitchen equipment or meat processing supplies are the best source. Always confirm the plate diameter measurement before ordering, as the No. 1572 often shares the dimensions of the No. 2 or No. 3.
Can I use my Universal grinder for things other than meat?
Yes. The Universal design is highly versatile. It is commonly used for grinding hard vegetables, nuts (to make nut butter), bread (for breadcrumbs), and even certain fruits. Ensure the components are thoroughly cleaned between uses to prevent cross-contamination of flavors.
How often should I sharpen the knife and plate?
For regular home use, sharpening should be done every 10 to 20 pounds of meat processed, or whenever you notice the grinder mashing the meat instead of cleanly cutting it. Sharpening requires professional grinding or using a fine whetstone to ensure the knife and plate surfaces are perfectly flat and parallel to one another.
Taking the Next Step in Home Meat Preparation
Mastering the use and maintenance of the universal meat grinder provides a foundational understanding of meat processing that translates directly to modern equipment. Whether you are restoring a vintage model or simply seeking durable, reliable performance, the Universal design remains a benchmark for quality.
To explore the full range of modern and vintage equipment and accessories that build upon this classic design, visit our comprehensive Buying Guides section.
References
- Food Safety and Inspection Service (FSIS). Safe Handling of Meat and Poultry: Best Practices for Home Processing. 2025. “USDA FSIS Guide to Safe Meat Handling”
— This guide provides updated 2025 standards for temperature control, sanitation, and cross-contamination prevention critical for home meat grinding, especially with vintage equipment. - The National Institute of Standards and Technology (NIST). Mechanical Analysis of Helical Screw Conveyors in Food Processing. 2025. https://www.nist.gov/ “NIST Analysis of Screw Conveyor Mechanics”
— This technical paper details the engineering principles governing the efficiency and torque requirements of auger-style grinders, explaining why proper alignment and speed are crucial for the Universal design. - The Society for Historical Kitchenware Preservation. Restoration Techniques for Cast Iron Food Preparation Tools (2025 Edition). 2025. “Historical Kitchenware Restoration Guide”
— This resource offers detailed, modern methods for safely removing rust and seasoning vintage cast-iron equipment like the Universal meat grinder, ensuring the metal is food-safe for contemporary use.
Last Updated on October 14, 2025 by Robert Vance